Probability

probability pic

Probability (P) : is a measure of how likely an event is to occur and is a number from 0 to 1 (0  <P <1).  It can be written as a decimal, fraction, or percent. We use probability to make predictions about future events.

  • If an event is certain to happen, then the probability of the event is 1 or 100%.
  • If an event will NEVER happen, then the probability of the event is 0 or 0%.
  • If an event is just as likely to happen as to not happen, then the probability of the event is ½, 0.5 or 50%.

Some real life examples using probability that you may be familiar with are statements like:

  • Today there is a 60% chance of rain.
  • There is a 50% (or ½) chance of getting heads when flipping a coin.

simple-probability-2

The probability of simple events describes a single event that occurs, such as flipping a coin, spinning a spinner, or rolling a die.

probability formula

The probability of rolling a 2 on a six-sided dice is:

prob. ex

Probability of flipping a 2 = 1/6 or 17%.

To view a mini-lesson on probability click here.

To try some problems on simple probability, click here.

The probability of compound events describes situations when two or more events are occurring.   For example, spinning a spinner and rolling a die.

compound probability

To determine the probability of an outcome when more than one event is occurring a model (chart or tree diagram) is a helpful tool.  A tree diagram shows all the possible outcomes of an event.

Example:  A coin is flipped 3 times.  What is the probability that the coin will land on heads all three times?

tree.diag.coin

According to the tree diagram, there are 8 possible outcomes.  Only 1 outcome shows 3 heads, so the probability is 1/8 that 3 heads are thrown.

Using multiplication to find the probability of a compound event, multiply the probability ratio of each separate event.

compound.ex.png


To watch a video on tree diagrams click here.

To practice with tree diagrams, click here.

Have fun exploring probability!

3 Dimensional Geometry

In seventh grade, we explore three-dimensional geometry, including finding the surface area of prisms and spheres.  We also find the volume of many different kinds of prisms.  Finally, we examine cross-sections of these solids.

Prisms

A prism is a three dimensional shape that “grows” from a two-dimensional base.

Prisms have:

  • No curved edges
  • Two parallel bases
  • Side faces that are parallelograms
  • Click here for more information on the properties of prisms.

Surface Area

We joke that when dealing with surface area, it’s what’s on the outside that counts!  To find surface area, find the sum of the area of all the bases and faces of the solid figure.

capture1

When finding the surface area of a sphere, students use the formula, 

Click here to watch a video on finding surface area of a prism, and here to watch a video on finding surface area of a sphere.  Click here to practice finding surface area for yourself!

Volume

When we work with volume, we return to the adage “it’s what’s inside that counts!”  To find the volume of a prism, we find the area of the base of the prism, and multiply it by the height.

Click here to watch a video about finding the volume of a prism, and here to try some practice problems.

Cross Sections

Time to slice and dice!  When taking cross-sections of 3-D objects, we take a horizontal or vertical slice of the solid.  The two-dimensional result is called a cross-section.

Click here to watch a video on cross-sections of a 3-D figure, and here to try some practice problems.  Happy slicing!

2 Dimensional Geometry

The word “geometry” calls to mind two- and three-dimensional shapes and the discovery of their properties.  These properties already exist in the world.  It is the mathematician’s job to uncover them, much like a great explorer.  In order to be a great explorer, we need to have an open mind, ask questions and solve problems.

Before solving geometric problems, we must be familiar with the language of geometry. Our students have created slide presentations to familiarize you with terms specific to our unit on geometry.  See student work here, here and here.

We study four aspects of two-dimensional geometry in 7th grade.

Angle Relationships

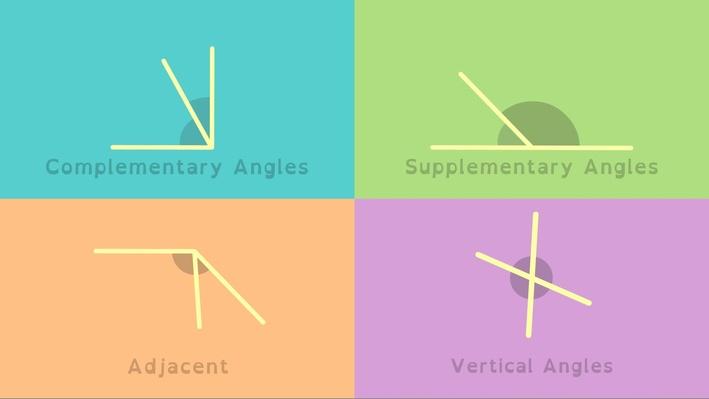
Angles are all around us.  The relationships between angles help create designs and are used in a plethora of careers.  In this unit we concentrate on the following angle relationships:  complementary angles (angles that add up to 90 degrees), supplementary angles (angles that add up to 180 degrees) and vertical angles (angles that are opposite and equal to each other).

Click here to practice identifying these angles.

Using these relationships, students are able to build equations to find missing angle measures.

Here is a video for more on these angle relationships.  Click here to practice solving for missing angles.

Triangle Measurements

Students have been using triangles since preschool.  They are familiar with the fact that a triangle is a closed shape which is formed by 3 sides. In this unit these sides are further defined  as line segments.  The points of intersections of the sides of the triangle are called the vertices of the triangle. The corners formed at the vertices are called the angles of the triangle.

So, in a triangle, there are 3 sides, 3 vertices and 3 angles.  

Here, ΔABC has Sides : AB, BC, CA Vertices:  A, B, C Angles: ∠BAC, ∠ABC , ∠BCA.

Students tested the triangle inequality theorem, which states the sum of the lengths of any two sides of a triangle is greater than the length of the third side.

Click here for a video tutorial on this theorem.

With protractors, students discovered that the sum of all the angles in a triangle is 180 degrees.  This is known as the triangle angle sum theorem.  Using this knowledge students were able to create equations and solve for missing angle measurements.

Click here to watch an example of how this theorem works.  Ready for some practice?  Click here to practice finding missing angles.

Area and Circumference of Circles

Working with circles is different than working with polygons.  For one thing, students become reacquainted with that unique ratio that exists in relation to all circles :

Pi is the ratio of the circumference to the diameter of any circle.  We use this ratio in the formulas to find both area (number of square units within a circle) and circumference (distance around a circle).

Click here to solve some practice problems involving finding the area and circumference of a circle.

Area of Composite Figures

Ever notice that some figures are comprised of a combination of shapes? These types of figures are called composite figures.

Take a look at this video showing composite figures all around us.  In this unit students learn to separate these composite figures into familiar shapes, and to use the area formulas they already know to find the area of these complex shapes.  

Here’s a video explaining how to separate these figures.  Try some on your own… click here.

Please feel free to comment on this blog.  Good luck!

Inequalities

Our students have been working with inequalities since elementary school.  Their first introduction to inequalities involved using symbols to compare the values of numbers.

Image result for inequality symbols

Through this comparison, students begin to develop their number sense.

As we progress further into the world of algebra, we begin to compare the values of algebraic expressions and numeric quantities.  Inequalities now contain variables, and can be solved, using the same methods we use to solve equations.

Image result for solving algebraic inequalities

Once we have solved the inequality, we have a solution set, or a set of numbers that will make the inequality true.  In order to visually represent the solution set, we use a number line.

Image result for graphing inequalities number line

Watch this video that helps explain the process of graphing an inequality.

Of course, there is always a twist!  Students have learned, through trial and error, that inequalities remain true no matter what quantity is added or subtracted to both sides of the inequality symbol.  However, when each side is multiplied or divided by a negative number, the direction of the inequality sign reverses.

Image result for multiplying inequalities by negative numbers

Watch this video for a more detailed explanation of dividing and multiplying inequalities by a negative.

Don’t worry, we included some practice problems for you!  Good luck!

Solving Equations

equation-labels

When solving an equation, students are solving to find the number that is missing. This missing number is usually shown as a letter (variable).  To “solve an equation”  they are finding the value of the letter (variable) that is missing. Students will extend their visual balance model strategies of “doing the same thing to both sides” to include mathematical operations to solve multi-step equations.

How does the “Same to Both Sides” Method work?

The “Same to Both Sides” method works by isolating the constant terms on one side of the equation and variable terms on the other side by undoing the mathematical operations. Undoing means to do the opposite mathematical operation that is currently in your equation. Students are reminded to keep the equation in balance, they must perform the same mathematical operation on both sides of the equal sign as they are isolating these terms.

EXAMPLE:

vbs-equation-edit

Click here for a video tutorial on solving equations using this same to both sides method.

Once the value for the variable is found, this solution should be put back into the original equation to see if it is correct.  This method of checking your work is the best way to be sure the solution is correct.

vbs-checkReady to try some problems on your own?  Click here for khan academy practice on solving equations with variables on both sides.  Don’t forget to check your work!

How does this method apply to equations when fractions are involved?

stbs-fractions

Click here for a video to further explain how to solve equations with fractions.  When your finished try some problems on your own by clicking here.  Good luck!

Models for Solving Equations

Mathematical and scientific models help students understand complex ideas by simplifying them or making them easier to visualize.  We begin our unit on Equations by continuing to use our bags and blocks model from our previous lessons.  By adding a balance, students can model algebraic equations and find more efficient ways to solve them.

bags-blocks

Click here to view a video relating the balance model to solving equations.

Students use the visual image of the balance model to understand the process of solving equations.  They translate this image into mathematical operations and begin to solve simple algebraic equations.

Click here to practice the balance model on an interactive scale.

Simplifying Expressions

The sentiment of “simplifying” generally means removing the unnecessary in order to get at a true meaning. In mathematics, simplify can have different meanings in different situations.   Students first learn the term, “simplify,” when working with fractions.  To simplify a fraction, students divide both the numerator and the denominator by the greatest common factor.  See the example below:

As we continue our work with algebra, simplifying takes on another meaning.  We will address this new meaning in three parts.

Part One:  In our last blog, we defined, “simplify,” as reducing an expression to its simplest form by grouping and combining terms that are alike.  We begin by connecting like terms to a real-life situation, such as putting in a fast food order.  See the example below”

We continue by identifying the differences between terms that are a number, terms that contain a variable, and terms that contain a variable with an exponent.  Students use different shapes to “collect” terms.  The different shapes are used to show that they can only combine terms that are “alike.”  Please see this video to help you understand how students combine like terms in order to simplify an algebraic expression.

Part Two:  Sometimes, students are given expressions that contain parentheses that may look like this:

2(g+ 4)

A number outside, or next to, an expression within parentheses means multiply.  In this case, the (g + 4) is being multiplied by the 2.  We call this process of multiplying an expression by another term expanding.  In order to expand, we multiply each term within the parentheses by the term outside the parentheses.  We call the property that describes this kind of multiplication the distributive property.  Students draw arrows to show they are multiplying, and so this method is called the “rainbow method.”  Some examples:

Image result for algebra expand

Watch this video to learn more about simplifying expressions by expanding and using the distributive property.

Part Three: When students expand an expression, they are using the distributive property to multiply two factors.  A factor is another word for a term that is being multiplied. In the expression,

4 x 5 = 20

4 and 5 are factors.  In the expression,

2(g+ 4)

2 and (g + 4) are factors.

Sometimes students are asked to, when given an expanded expression, rewrite it as a factored expression.  Basically, we are asking students to determine the two or more factors that were used to create the expanded expression.  As students multiply to expand an expression, they divide to factor an expression.  See the examples below.

Click here to watch a video that will help you understand how we factor expressions.

Ready to try a couple? Here’s a link to try combining like terms, as well as a link to expand expressions using the distributive property.  Finally, try to factor a few expressions by clicking on this link.  Remember, most of these practice problems are linked to instructional videos that you and your child can use to further understand the concept.  Good luck!

Evaluating Expressions

Translating, or the ability to take words from one language and turn them into another language, is an important skill.  However, even more important than translating words is understanding the meaning of the words.  In mathematics, we call this skill evaluating an expression.  (see our previous blog for a definition of expression.)  Students will use two methods to evaluate expressions this term.

Method #1: PEMDAS

Not all expressions have variables.  Students have been evaluating numerical expressions for some time using the acronym PEMDAS.  This acronym stands for “Parentheses, Exponents, Multiplication, Division, Addition, Subtraction.”  Students use this acronym to help them remember in which order they should start their computations.  Please see the example below:

12 ÷ 3 + 4 – 24 ÷ 3 • 8

4 + 4 – 24 ÷ 24

4+ 4 – 1

8 – 1

7

Watch this video for a quick refresher on this topic.

Method #2: Substitution

To evaluate an algebraic expression, you substitute values for the variable(s). Then, you calculate a value, or number, for the expression.  Below is an example of using values for variables to simplify an expression.

2x2 + 3y + 6 if = 2 and y = 9

2(2)2 + 3(9) + 6 =

2(4) + 27 + 6 =

8 + 27 + 6 =

35 + 6 = 41

Another word we use when evaluating expressions is simplify: To simplify an expression, we reduce an expression to its simplest form by grouping and combining terms that are alike.

Example:

To simplify the numeric expression 5 • 4 + 1, we would first multiply 5 • 4 to get 20, then add 1 to 20 to reach our simplest form, 21.  Stay tuned for our next blog on simplifying algebraic expressions!

Feel like practicing?  Try this link on Khan Academy.  The goal is to get 5 questions right in a row – harder than it sounds.  Good luck!

Translating English to Math

We have begun our unit on Algebraic Expressions.  Many students have heard the term “algebra” before, but this year we will explore the role of algebra in the world outside of the math classroom.  Sal Khan, the founder of khanacademy.org, has a great video on the beauty of algebra here.

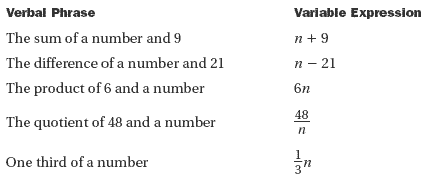
Learning algebra is like learning another language.  Students are asked to translate phrases in English, such as, “Six less than twice a  number” to “2x – 6.” Watch this video in order to get a better idea of what we mean by translating English to “Math.”

We will refer to commonly used phrases in English that indicate different operations. Here’s an example of words we can use to show subtraction.

blog1a

A site called Quizlet may help you to practice using these phrases. Click here to try Quizlet for yourself.  Happy translating!